MyCalendarAlerts


     ||       Create New Account      ||       Help docs      ||      


Welcome to
`MyCalendarAlerts!`


Table of Contents:


INTRODUCTION:

 The MyCalendarAlerts® app is not itself a calendar, but extends the functionalty of all your existing calendars. MyCalendarAlerts lets you create extremely simple yet powerful rules to trigger actions for all your calendar events. The tiggered actions can be as simple as email and text alerts to your group of friends, family or colleagues, or it can trigger a sophisticated automation on a remote computer system.

Alert Flow

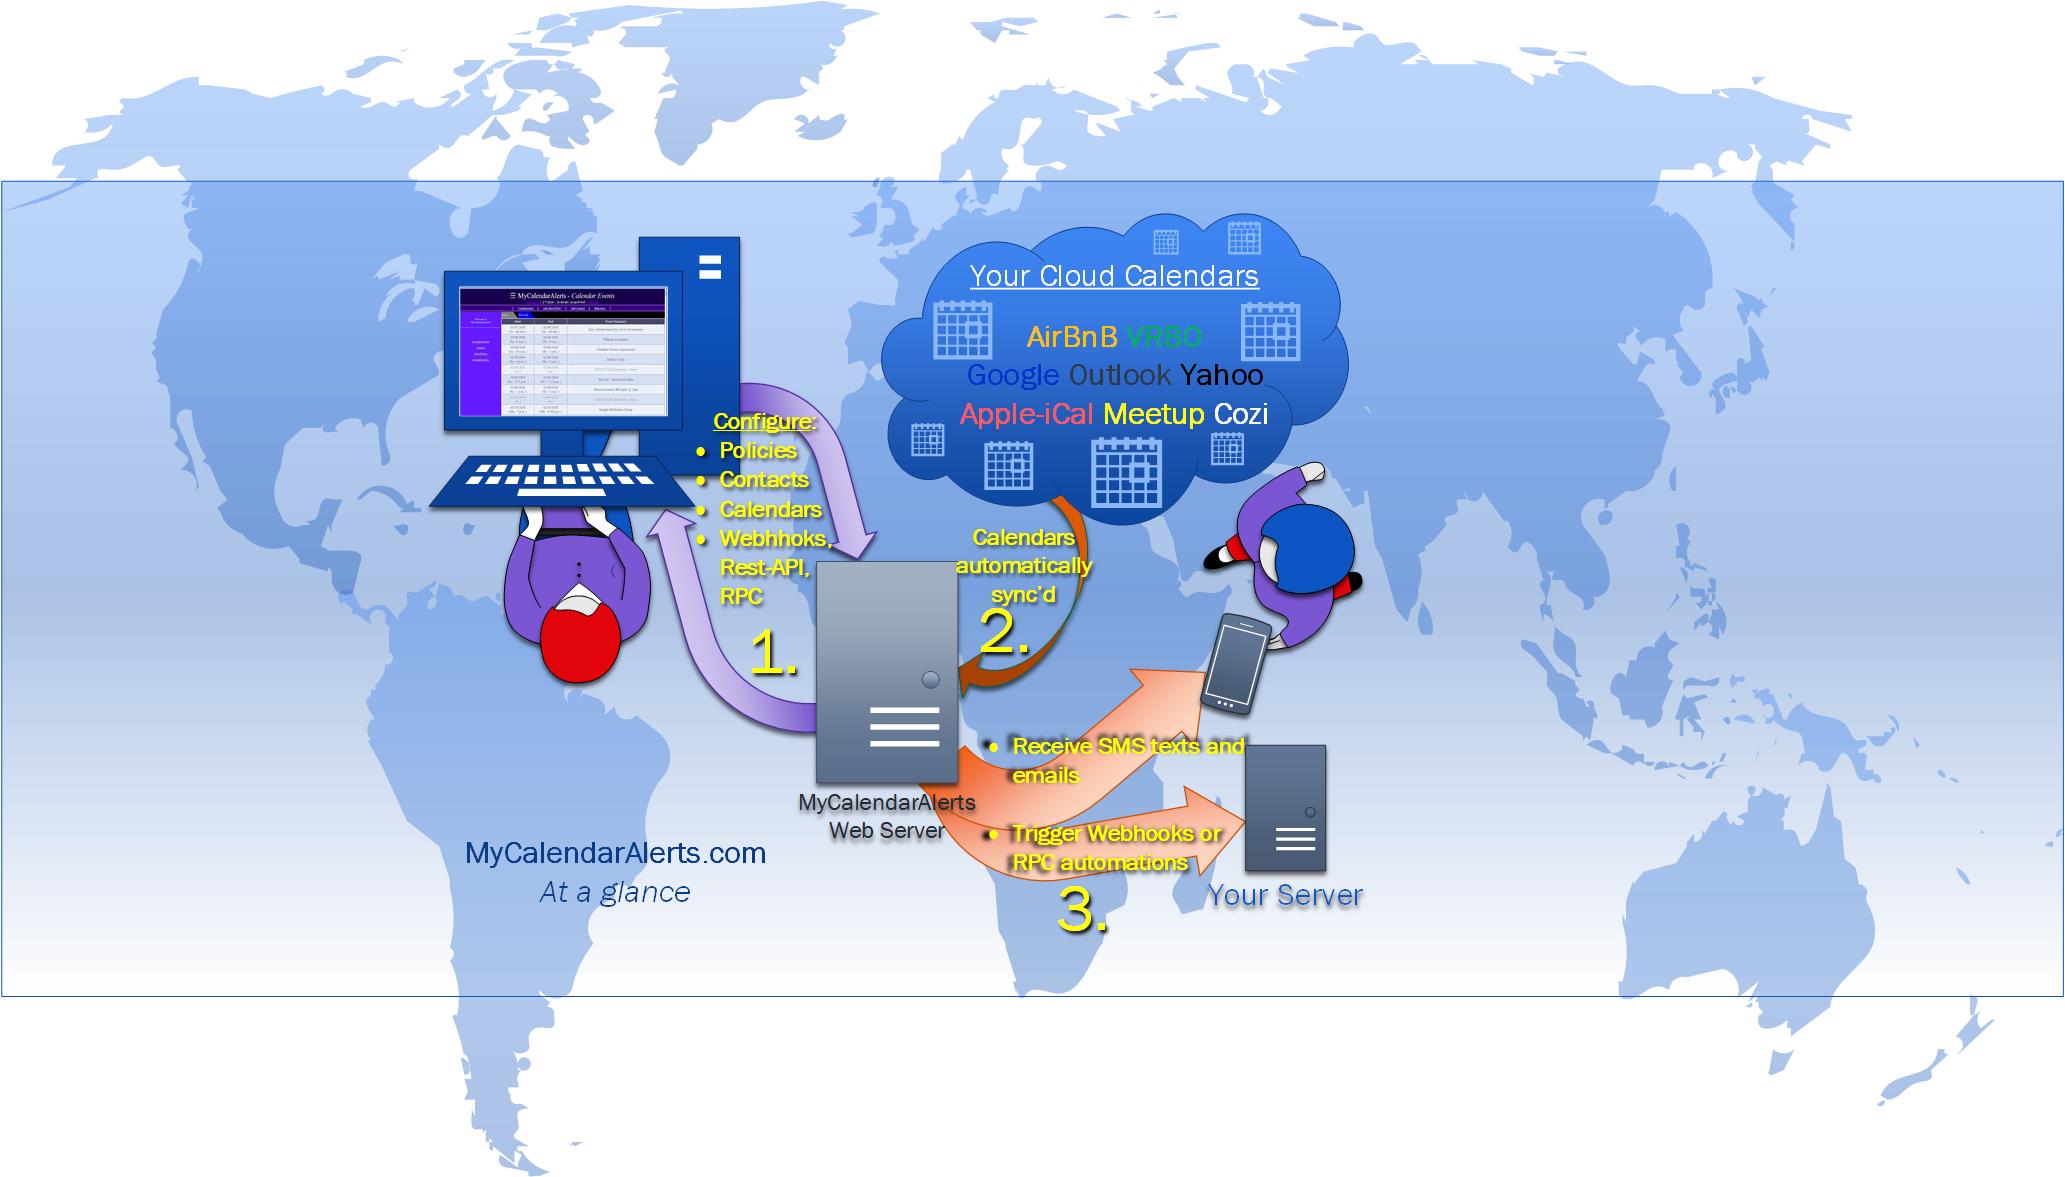
So how is this different from your calendar's notifications? Here are a few features that we include:
  • Unlike most calendars that require you to create an alert for each event, MyCalendarAlerts allows you to create Alert Policies (alerting rules) that apply to ALL events.
  • Also unlike many calendars, MyCalendarAlerts enables SMS text-alerts (in addition to email-alerts) for notifications that require extra attention.
  • With MyCalendarAlerts, you can add contacts to receive alerts based on their own subscribed Alert Policies.
  • MyCalendarAlerts allows you to send calendar-summaries as texts to your contacts as well as group emails and texts.
  • Configure MyCalendarAlerts to recieve automatic notifications anytime your calendar changes. This is very helpful for those who have calendars in which customers self-schedule appoinments or rentals.
  • The ability to trigger other actions on other computers.


Here are some ways MyCalendarAlerts can make your life easier.

  • BUSINESS:
    • If you run a rental business, this app will help you with turnovers.
    • Whether a chiropractor, tax-preparer, therapist/counselor, workout/life-coach, or anyone else who takes appointments, MyCalendarAlerts will keep you up to date.
    • Have MyCalendarAlerts monitor your work-place calendar and send you alerts for meetings etc.
    • Add contacts for your business' service providers such as cleaners and maintenance to get notifications on your changing schedule.
    • Use REST-API, Webhooks, or RPCs calls to launch actions from updating websites and databases to activating business-transactions.
    • Trigger thousands of apps automations through integration hubs such as Zapier® and Make® (p.k.a. Integromat®).

  • PERSONAL:
    • If you need help keeping track of your personal appointments, MyCalendarAlerts can help.
    • Create a Birthday+Anniversary calendar for your extended family and set up policies for each person to get the announcements they're interested in.
    • Receive early notifications for holidays and other events.
    • Keep your group up to date with text reminders on social media sites like Meetup.com®
    • Send group emails and texts. Emails can include HTML for highly customized formatting.

MyCalendarAlerts was especially designed with individuals and businesses in mind who handle rentals such as Airbnb® and VRBO®. These business-proprietors have a need to receive timely alerts for customer arrivals, vacating customers, trash day, property cleanup, etc. MyCalendarAlerts makes it simple. MyCalendarAlerts can be used for most any calendar that provides a URL to download & sync their calendar including Google, Yahoo, AirBnB, Meetup, etc.


PRICING:

 MyCalendarAlerts services are provided through subscriptions based on the needs of the individual or business. Below is the account subscription pricing. The limited FREE Trial account allows you to try the service indefinitely before signing up for a paid-subscription.

Available subscriptions:

Feature Trial (Free) Basic Account Basic+ Account Prem/Bus Account
Monthly Fee FREE!
$3/Mo
$5/Mo
$10/Mo
Max Contacts
Max Contacts 2 10 25 50
Max Alerts/Mo
Max Alerts/Mo 10 100 200 500
Max Group Messages/Mo
Max Group Messages/Mo 10 20 50 100
Max Calendars
Max Calendars 1 2 3 3
Premium SMS Texting(ClickSend)
Premium SMS Texting(ClickSend) 0 0 0 100
Customer Support
Customer Support Online, Emails Online, Emails Online, Emails Emails, Ltd.Ph


 Subscription options are presented when creating a new account or when pressing the "Upgrade Account" button (for Trial accounts) from the Account Configuration. Once subscribed, the "Upgrade Account" changes to an "Unsubscribe" button in the Account Configuration.
The "Unsubscribe" button can be used to cancel subscriptions and must also be used before upgrading or downgrading subscriptions.

Note that MyCalendarAlerts does NOT maintain the subscriptions nor billing of payments.
MyCalendarAlerts simply provides a button to navigates to PayPal where payments and subscriptions are handled.


GETTING STARTED:

 To get started, you will simply do the following by first creating a MyCalendarAlerts account:

  1. Create your account
  2. Configure the account by providing the URL to your online-calendar & your time zone
  3. Create alert policies which define the rules of when alerts are sent to contacts
  4. Add contacts (alert recipients), their email address, cell phone, and cell carrier (needed for text alerts with no additional charges)
  5. [Optional] Add remote APIs webhooks or RPCs (only if using MyCalendarAlerts for triggering automations)

Create New Account
Configuration Setup
Add_Alert Policy
Add Contacts
Add Remote APIs
  Done!  

 See below details for each of these steps. Links for each of these activities are at the top of the web page.


ACCOUNT CONFIGURATION:

The account configuration gives options for the following features. The sync URL is required for the setup to be complete and function correctly:
  1. [REQUIRED] Calendar-sync URLs (These URLs are required for importing your calendars to MyCalendarAlerts). Where & how to obtain this URL depends on the calendar web-app. Instructions are usually easy to find with a quick search for "How to sync [google|airbnb|yahoo|...] iCalendar ICS file with other programs").
    Below are list to instructions for getting the sync URL for some popular calendars: Other things to note:
    • Once you obtain the URL, you can do a quick test by pasting it in your browser's URL address field and ensure the ICS file is downloaded. Open the file and confirm it has "BEGIN:VCALENDAR" on the first line.
    • Any web app that provides a URL for downloading the calendar ICS file is acceptable, but procedures sometimes vary even from the official help pages of the app service documentation.
    • Once the URL is provided, MyCalendarAlerts will automatically keep your calendar in sync
    • MyCalendarAlerts frequently checks for calendar updates
    • For more details on Calendar-sync URLs and how to obtain them for these calendars go to this help section for Calendar-sync URLs

  2. Your time zone: Setting the time zone correctly is crucial for receiving alerts at the expected time.
    For details on setting time zones and the expected behavior, see this help section on setting time zones.

  3. Premium SMS Texting options (Specify if an account-level paid SMS texting service is available for contacts utilizing MyCalendarAlerts Premium accounts or accounts that use their own prepaid ClickSend accounts). The options include:
    • N/A - Account-level paid SMS service NOT available. Contacts must use other messaging service than an account-level premium service.
    • OPTIONAL - Account-level paid SMS service AVAILABLE but OPTIONAL. Contacts can optionally select the account-level premium SMS service.
    • ALWAYS - Account-level paid SMS service AVAILABLE and ALWAYS used. Account-level paid SMS service will be used regardless of the contact's configuration.


    NOTES:
    1. Premium SMS options are only available for MyCalendarAlerts Premium accounts or account who use their own prepaid ClickSend account.
    2. Contacts must also be configured for the preferred messaging options. The behavior of how the combination of the "account-level premium SMS options" and the various options for each contact is documented in the help page for understanding chat & SMS messaging configurations.

  4. The Webhooks and RPCs options are for triggering automations.
    This is the field to use for the automation hub Make.com (p.k.a. Integromat®) and also for any other Webhook not part of an automation hub. Zapier® webhooks however are configured from the Zapier® account when you enable a 'zap'.

    Webhooks and RPCs are also configured in the Remote APIs Manager. These remote APIs can then be linked to policies and will fire each time the policy triggers an alert.

  5. Alert Subject(Specify customized text & email subject)

  6. Text-Subject Options(Specify whether to use default, customized or no subject)

  7. Use default email address(Optional email server & password config ignored when selected and calendar.alerts.host@gmail.com address is used)

  8. Optional Email Configs:
     Configuration an account email is optional. However, because the MyCalendarAlerts default email is overused for email2text notifications, it often become blocked and unreliable. For this reason, if you use the free email2text feature, configuring your own email address is highly recommended!
    Configuring your own email address will have the added side benefit of incoming emails coming from your email. Below are the fields that are required. Pay special attention to configuring the password for "3rd-party apps".
    • Your 'FROM' email address.
    • Your 'FROM' email password. Warning! Your regular email-login password may not work! You may need to follow the instructions from your email provider on how to create a 3rd-party app passwords. Below are links to some examples:
    • Your 'FROM' email SMTP server. (Your email service provider should have this documented online and easily found with quick search)
    • Your 'FROM' email SMTP server PORT.
    • Alert Exclusion Keywords - Comma-separated list of summary-event keywords to exclude from alerts. The events will still show in the upcoming events but not in the scheduled alerts.

  9. Pause Monitoring(This option will pause all activity including email and text alerts as well triggering automations)


ADDING ALERT POLICIES:

   MyCalendarAlerts "Alert Policies" define the alerting rules that result in texts, emails or triggering remote APIs. Alerts come in the form of texts, emails or triggering remote APIs. Although you can customize policies with filters, by default they are 'applied' to all scheduled calendar-events to generate a list of scheduled alerts.

The website monitors these scheduled alerts and sends texts or emails to the subscribed contacts when the date and time are reached.
It is best to create alert-policies before adding contacts who will receive the alerts, because you will subscribe each contact to their own set of alert-policies. Before a policy applied to an event triggers an alert message, the policy must first be subscribed to a contact.

"Alert Policies" allow you to make rules such as the following examples:

  • Notify me the day of (or N days before) each customer's arrival (so I can send them instructions)
  • For any event that includes a time, send me a notifications X minutes before the start of the event.
  • Alert me N hours before each customer leaves (so I can notify a cleaning crew)
  • Text my cleaning crew the day before each customer arrives and leaves so they can plan to go clean
  • Give us a an email-warning 2 days before each customer leaves
  • Send my group a notification-reminder 10, 5 and 1 days before our event.
  • Send me an alert for every event that INCLUDEs this string or EXCLUDEs that string.
  • Trigger a remote API to update my database every time an appointment starts.
  • Reserve these resources when someone books them on my calendar.

Detailed Description of Alert Policies

Note that Alert Policies apply to ALL calendar-events (except when filters are included). When you create these rules, scheduled alerts are generated where the rules are applied to each upcoming calendar event. For example, if you have a rule to notify yourself the day of the event (e.g. the beginning of a rental) and a 2nd rule to notify you the last day of the event (e.g the end of a rental period) and you have 10 future calendar-events (e.g. for 10 scheduled guests), 2 x 10 = 20 scheduled alerts will be generated. The alerts list will be automatically regenerated each time you modify the policy's timing fields or anytime the calendar is updated.

 Excluded Events: There is an exception to the above comment that policies apply to ALL calendar-events. The policy form and the Configuration Setup includes fields for "Event Exclusion Keywords" & "Event Inclusion Keywords" that allows you to add a comma-separated list of event-keywords to exclude or include. Therefore, for example, if you have events you don't want alerts for, you can add their keywords to the Exclusion Keywords field. These fields will configure all policies you create. However, you can override this setting with the same fields inside the individual policies.

 Another thing that is worth re-emphaizing is that before a policy applied to an event triggers an alert message, the policy must first be subscribed to a contact. Although setting up a policy is sufficient for triggering remote APIs, it will not be sufficient for receiving alerts. You must first subscribe from the contact form

 The below image shows a typical calendar event and depicts the different date-related characteristics you will utilize when creating Alerting Policies/Rules. Note that it has the following date & time-related characteristics which are common to all calendar events:
  • START Date & Time
  • END Date & Time
  • Days & Time relative (BEFORE & AFTER) the START Date & Time
  • Days & Time relative (BEFORE & AFTER) the END Date & Time
Below depicts the days relative to a calendar event
Alert Policy Help

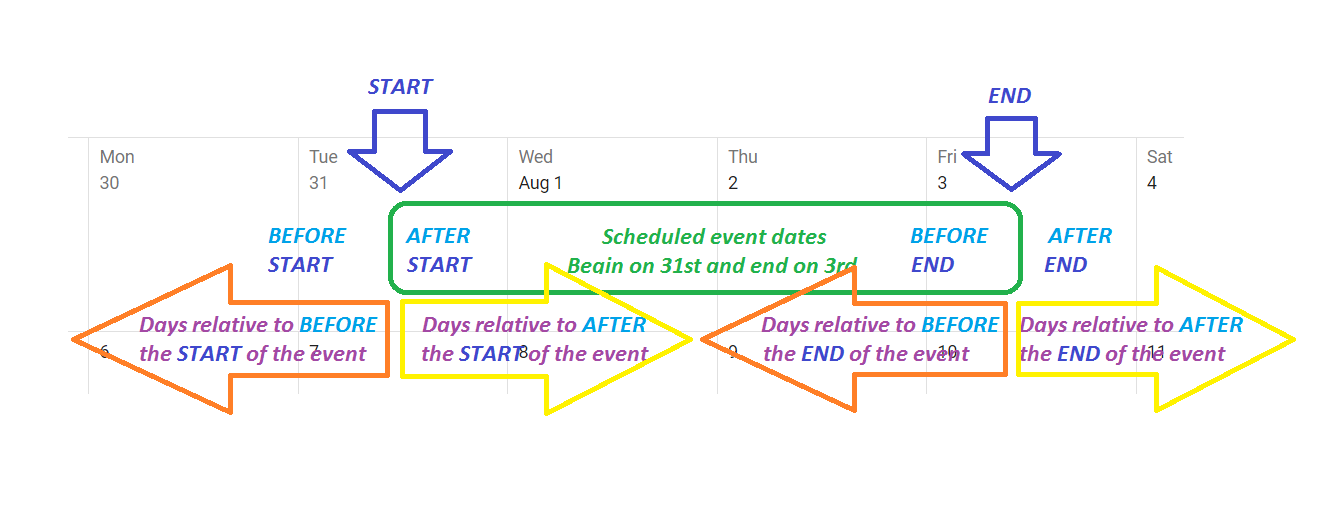
Below are some of the key Alert Policies fields/settings and characteristics:

  • "Use Relative Time-Based alerts" - You must check this flag to use the below "Relative # of Minutes" option. When used, alerts will fire "Relative # of Minutes" BEFORE or AFTER the START or END of the event.
  • "Relative # of Minutes" - This field allows you to schedule events N minutes BEFORE or AFTER the START or END of the event. This field only applies to events that included a time. It is ignored for all-day events. All-day events will revert to the default time to fire specified in setting "Default Time of day to send alert".
  • "Relative BEFORE or AFTER" - This setting specifies if an event should alert relative to BEFORE or AFTER an 'edge' (START or END) of the event.
  • "Relative START or END" - This setting specifies if an event should alert relative to the START or END of the event.
  • "Default Time of day to send alert" - This setting specifies the TIME when alerts will fire. if "Use Start-Time Based alerts" flag is NOT checked, this will always be the time for the applied events to fire. if "Use Start-Time Based alerts" flag IS checked, this setting only will only apply to events that DON'T included a time (i.e. all-day events). Otherwise, time field "Relative # of Minutes" will be used to add or substract the minutes from the START or END time to calculate the time to fire the alert.
  • "Event Exclusion Keywords" - This setting specifies a comma-separated list of keywords to search in the event-summary. If ANY of the keywords are found, this policy will NOT apply to that event. This setting is not case-sensitive.
  • "Event Inclusion Keywords" - This setting specifies a comma-separated list of keywords to search in the event-summary. If ANY of the keywords are found, this policy will apply to the event. If NONE of the words exist, the policy will be skipped for that event. This setting is not case-sensitive.
  • "Available Remote APIs to subscribe" - This is a list of Remote APIs you configured. Select (check) any remote APIs you wish to link to the policy. All remote APIs linked to a policy will get called/triggered every time an event alert fires based on this policy. See the remote API section of this help for discussion on how these work.

Alert policy rules are based on these characteristics. In order to setup alerts to handle the previous mentioned examples, you will setup your policies to fire alerts based on the days relative to the event. Below are some examples of Alert policy settings and what they mean.


Alert Policy Examples
Alert_Policy_Name/Title Alert Relative Days Count Alert Days Relative BEFORE? Alert Days Relative To START? Alert Time To Fire Description:
Guest arrives today! 0 True True 9am Alerts will be sent the morning of the START of the event (guest-arrival) at 9am.
Guest leaving tomorrow 1 True False 9am Alerts will be sent the day BEFORE of the END of the event (guest-leaving) at 9am.
2 Days past since the end of the Event 2 False False 12pm Alerts will be sent 2 days AFTER of the END of the event (guest-left 2 days ago) at Noon.

  • Note that when "Alert Relative Days Count" is set to zero '0', it means "the day of" (i.e. the day of the start of event or the day of the end of the event). For any value N > 0 for "Alert Relative Days Count", the alert will be fired N days BEFORE or AFTER the START or END of the event depending on the other settings.


  • Scheduled Alerts will be regenerated when either of the following occurs:
    • Alert policies are added, deleted, modified
    • The calendar has been updated (e.g. new events added)
    Other notes:
    • Changing time zones will NOT force the scheduled-alerts to be regenerated, but will of course affect the time in which the alerts are fired.
    • No contacts will not receive alerts on policies that have not been subscribed; even if a generated alert show in the Scheduled Alerts. You must add contacts and subscribe them to the policies to receive the alerts.

    ADDING CONTACTS:


    Adding contacts is required in order to receive alerts. This is best done AFTER adding alert-policies, so that you can subscribe each contact to the policies they need to receive. Note that you will NOT automatically receive alerts with the registered account contact information; You MUST first add contacts and subscribe those contacts to policies! Adding contacts is as simple as providing the following:
    • Contact's First and Last Name
    • Country Code (Used only for International numbers. Can also include extra prefix digits if the Cell Phone number field is not long enough. If this CC is included, the cell-carrier gateway information is not used for texting)
    • Cell Phone number (Required if you need to send SMS text alerts to the contact)
    • Cell Phone Service Carrier (Also required if you need to send free SMS text alerts to this contact using email2text)
      • This field will allow the app to send FREE SMS text messages to your contacts. Without this option, a paid service that includes ClickSend® is required in order to send SMS text messages.
      • Note: The app will try to determine your the Cell Phone Service Carrier automatically. You can also try to determine the Cell-Carrier by either asking your contact, or trying this site or this site.
      Section for configuring free email2text SMS texting: Warning: Using the free email2text service can be unreliable. See the help page understanding chat & sms messaging configurations for details.
    • Cell service provide: "Other (Use list below)" (This field is usually automatically populated. If not, use the drop-down list if using one of the primary service providers)
    • Cell service provide: "Other (Use input field below)" (Use the input field to manually type in the cell-service provider's email-2-text gateway starting with the '@' at-character.)
    • Carrier email2Text gateway (Other-Input):" (Type in the provider email2text gateway if 'Other-Input' selected above. Must start with '@' and end with .com or .net)
    • Section for configuring messaging service SMS texting or CHAT app: Because of the unreliability of the free email2text SMS services, MyCalendarAlerts enables other options for recieving notifications.
    • SMS/Chat Messaging service option (This dropdown gives a list of your messaging options. See above notes for details on each option)
      • Email2Text - Free but unreliable. See previous notes for how to configure.
      • ClickSend - You can create an account with ClickSend.com to purchase SMS services and configure the account information at the account level (available to all contacts) or at the contact level.
      • PushOver App - Install the PushOver App, create a FREE account on Pushover.net, then configure your account information. This is required for each contact who would use this service. (This is the option recommended by MyCalendarAlerts regardless of your account type)
      • MyCalendarAlerts Premium account - If you are already subscribed to a "Premium" account, MyCalendarAlerts will use a premium service to send reliable SMS texts.
    • Message Service UserID (User ID for Pushover App or contact-level ClickSend account)
    • Message Service Token (Token/password for Pushover App or contact-level ClickSend account)
    • Enable text alerts(Uncheck to disable text alerts for this contact)
    • Email Address (If you want to send email alerts to the contact)
    • Calendar Summary Notification Frequency(Select "Every time calendar changes" to receive automatic calendar updates)
    • Available Alert Policies to subscribe (Click the checkbox for each policy this contact should be subscribed to for alerts)
    • Don't forget to press save after entering all of the above data.
    Other features and tips:
    • SUBSCRIBED POLICIES:Remember that you will not receive alerts on any policies that have not been subscribed even though they show in the Scheduled Alerts. Subscribe each contact to their policies as mentioned above in order to receive those alerts.
    • CALENDAR SUMMARIES:The [Send Calendar] button will send a summary of the calendar (Max 30 days!). This button can be used to test the email2text feature for this contact. However, you MUST first save the contact information BEFORE testing. If you make changes (e.g. cell-number or cell-carrier) without saving, that information will be ignored and the last saved information will be tested.
    • GROUP MESSAGES: Once you enter all your contacts, go to the Contacts List and you will see a link for sending group messages. From here you can compose a message and select texting and/or email options for each contact. For emails, you can include HTML for highly customized messages.


    READY TO GO!

    At this point you are ready to go! You should now be able to see your:
  • Examine the scheduled alerts to ensure they are as expected and if not, make the necessary adjustments to the alert-policies.
  • Note that you will not receive alerts on any policies that have not been subscribed; even if they show in the Scheduled Alerts
  • To make sure everything is good, try this test:
    1. Go to contacts and click on one of the contact links.
    2. Ensure the contact has an email and cell phone number and that they are enabled for receiving emails and texts
    3. Ensure the contact has a subscribed policy and click on that link
    4. Set the values START|END, BEFORE|AFTER, Relative-Days, and Time to fire, so that it is just a couple of minutes into the future then press SAVE.
    5. Click on the Scheduled Alerts link to ensure your expected alerts are about to fire.
    6. If all above was setup correctly, your contact will receive an email and text when the scheduled alert time is reached.
    7. When confident all is working ok, don't forget to set the policy back to the normal settings.

    YouTube Videos & Facebook

     In addition to below help, you can find extra help in the MyCalendarAlerts YouTube channel:  Have more questions and wish to discussed with the MyCalendarAlerts community? You can reach out on the MyCalendarAlerts Facebook group:


    Automations With MyCalendarAlerts Remote API:
    • Remote APIs - definition and usage: In the context of MyCalendarAlerts, "Remote APIs" refers to internet APIs such as Webhooks, and RPCs (Remote Procedure Calls).
      • WebHooks (REST-API): WebHooks are internet APIs that allow websites/webapps of different companies to pass information between them and trigger actions on remote sites when certain events occur. For MyCalendarAlerts, the events that trigger the remote API calls, are the calendar-event alerts that are fired based on your alert policies.

        Internet Integration hub such as Zapier® and Make® (p.k.a. Integromat®) allow thousands of websites such as Google, Facebook and MyCalendarAlerts to leverage their own built WebHooks to transfer information and trigger some action on that data.

        For example, let's say you need to kick off an email/marketing campaign every time certain calendar events fire. With WebHooks, the program will receive all the details about the calendar event as well as the factors that triggered the alert (e.g. Your policy information). The local program, can then use that data to update databases, send reports, free or reserve rental equipment or properties or anything else that might be needed related to your calendar events.

      • RPCs: RPCs have similarities to Webhooks in that they are APIs to call functions that perform functionality on a remote system. Also like webhooks, the remote API calls are triggered by some event. As mentioned above, for MyCalendarAlerts, the events that trigger the remote API calls, are the calendar-event alerts that are fired based on your alert policies.

        For example, let's say you need a local program to run on your home or office computer every time certain calendar events fire. With RPCs, the program will receive all the details about the calendar event as the factors that triggered the alert (e.g. Your policy information). The local program, can then use that data to update databases, send reports, free or reserve rental equipment or properties or anything else that might be needed related to your calendar events.

        RPC calls can execute those programs on your computer. RPC calls are configured in the account configuration.

      • How to test a Remote API: MyCalendarAlerts includes Remote Api Testing Form that allows you to input sample data and send to a webhook to ensure the payload is recieved. This simulates the action taken when Remote API is triggered as the result of an event firing that includes linked Remote API(s).

        Tip! A better way for testing your remote APIs than going directly to the Remote Api Testing Form is to first go into the Remote APIs Manager, select the API you want to test, then from the remote API form, click link "Click here to test Remote APIs" at the bottom. This will populate the API test form with your remote API details. You will then just optionally change the test-data fields.

      So to summarize, APIs allow you to automate execution/transaction-processing on your remote computers or websites when your calendar alerts are triggered. These 'trigger->action' transactions help you to automate computer processing associated with business-related activity such as appointments, rentals, scheduling, or anniversaries.

      Remote APIs may be configured in MyCalendarAlerts in any of the following ways (use only one method):
      1. [GLOBAL] Webhooks and RPCs - In the Configuration Setup , fields exist for a single 'GLOBAL' Webhooks and/or RPCs. When configured, these will execute for EVERY calendar event alert you receive based on ANY policy that triggers the alert.
      2. [LOCAL] Webhooks and RPCs - A list of 'LOCAL' Webhooks and RPCs can be configured on any of your alert policies enabling highly-customized remote-api processing/automation. To create entries for the list of Webhooks and RPCs to link to policies, they must first be configured in the Remote APIs Manager. Once configured in the Remote APIs Manager, any number of the remote APIs in the list can be selected (i.e. checked). After selecting all remote APIs to link to the policy, just hit save and you are ready to go!
      3. Integration hub subscribed APIs - MyCalendarAlerts is integrated with integration hubs Zapier® and Make® (p.k.a. Integromat®). Integration hubs connect websites like MyCalendarAlerts to thousands of other potential sites specifically for accommodating remote API webhooks for passing information and triggering actions.

        A key feature of some integration hub Webhooks is that they are subscribed to as part of the setup on their site based on the format and authorization agreements of the endpoint-websites. Subscribed Webhooks are called "REST-Hooks". When you create an account on an integration-hub and specify a "trigger-action" connection between two websites, those websites will automatically create and link the Webhooks/REST-Hooks based on your authorization, so there is no need to specify the URL in any MyCalendarAlerts configurations since it is done automatically.

        With Webhooks outside of an integration-hub platform, you will need to ensure the two endpoints agree on formatting, security, etc. While REST-Hooks are utilized by Zapier and are therefore configured when enabling 'zaps' that include MyCalendarAlerts, Make (p.k.a. Integromat) uses Webhooks which must be manually configured either in the GLOBAL or LOCAL webhook configuration options.

        See below details for these integration hubs. For help and questions about how to setup any of the Remote APIs, please send us an email.

    • Zapier®: Go to the Zapier configuration help section to learn how to use MyCalendarAlerts to trigger Zaps.
      Zapier.com is web service that acts as a hub for many other web applications including MyCalendarAlerts. Zapier® allows interactions between web applications that might not normally communicate. Think of the Zapier hub as a train station junction where web apps like Google®, Facebook® and MyCalendarAlerts® are the trains brining information into the junction that other trains (web apps) can now access and take action on.

      For example, a calendar alert can trigger MyCalendarAlerts to post data to Zapier that is then sent to Facebook® to create a post. Zapier® hosts thousands of apps allowing inumerable interactions and ways to drive automations based on your calendar events.

      Zapier.com offers free accounts to make it easy to get started. For more information on configuring MyCalendarAlerts with Zapier®, please go to the Zapier configuration help page.

    • Make® (p.k.a. Integromat®): Make is another integration hub that enables triggered-action automations. Make® was previously known as Integromat®, but the Integromat platform, brand, company is rebranding as Make. See the Make FAQs for more details on the changes. MyCalendarAlerts is fully integrated into the Make platform. If you have an account on Make, the platform will provide webhooks required to trigger actions for other applications. All you need to do is to add that webook URL in the MyCalendarAlerts configuration field for "WebHook URL".


    ACCOUNT MAINTENANCE:

    Note that MyCalendarAlerts does NOT maintain the subscriptions nor billing of payments.
    MyCalendarAlerts simply provides a button to navigates to PayPal where payments and subscriptions are handled.

    How to Upgrade or Downgrade Account Subscriptions:
     When first created, an account starts off as type Trial. With this type of an account, the Account Configuration will show an "Upgrade Account" button to change to a paid-subscription.
    Once subscribed, the "Upgrade Account" changes to an "Unsubscribe" button which is used to cancel subscriptions which will downgrade back to a Trial account.
    The "Unsubscribe" button will then return to a "Unsubscribe" button which can be used to subscribe to a new paid-subscription.

    How To Cancel An Account Subscription:
    If there is a need to cancel your subscription, you use the unsubscribe button from the Account Configuration which will take you to your PayPal account to cancel the subscription.
    MyCalendarAlerts is not able to directly add or remove subscriptions from your PayPal account.
    Cancelling a subscription will downgrade the account to a FREE Trial account.

    How To Cancel An Account:
    If there is a need to completely cancel your account and you have a paid-subscription you must first unsubscribe (cancel your subscription) as described above. This will downgrade your account to a Trial account. At this point, you will see a button that will allow you to cancel the account.

    How To Reactivate A Cancelled Account:
    In the event you cancelled an account, but wish to reactivate it, you will still have your credentials and config files kept intact for a period of time. You will simply need to go back to the configuration settings and click the button to Re-activate the account.
    However, you will likely need to subscribe to a paid-subscription to restart calendar monitoring and alerting.

    Tips

    Testing Email2Text

    Your contacts can configure a free email2text option if you are within the United States. To test your email2text configuration, go to the group messaging form option, check the 'Texts' checkbox for all contacts to test, add a message and press 'Send Message'.

    You should get a text message within a minute or two max. If you don't receive one, there could be a problem with the email2text setting on the contact, or possibly an email configuration problem Account Configuration.

    Testing Alerts

    Go to this link to test alert policies

    Restricted view

    Would you like to share your MyCalenarAlerts link with one of your contacts to view your calendar events? An example of where this can be helpful is when you want to share the dates of short-term rental guests coming and going with your cleaner.

    To share this information, you can provide the following link:
    https://www.mycalendaralerts.com/CalendarAlerts/[account_name]/[contact_phone_num]

    Example: https://www.mycalendaralerts.com/CalendarAlerts/events_pending/CA000000n/2015551212
    Where CA000000n is your account number found at the top of the Account Configuration form and 2015551212 is your contact's phone number.

    Terms Of Services

    Click this link to review the most up-to-date MyCalendarAlerts Terms Of Services

    Contact us:
     Having problems you just can't figure out? We invite you to submit questions here.
    Got questions that might benefit others? Reach out to us on Facebook. Start a converstaion and tell us how you use MyCalendarAlerts or features you need activated.